Ch017 - Polish: Add Animation to your Character
Polish: Add Animation to your Character
Animating our player so it looks like it is running is made fairly easy by the Phaser framework. If we had to start coding this whole process from scratch then we would be here a long time. Luckily making simple animations is something that many game players want to do so we have some good coding tools for it.
What we need to know and what we will do
To be able to do this step it would help if you knew about the following from this book;
- Understand the core structure of our game - see Building a World
- Understand Conditionals - see Adding Movement
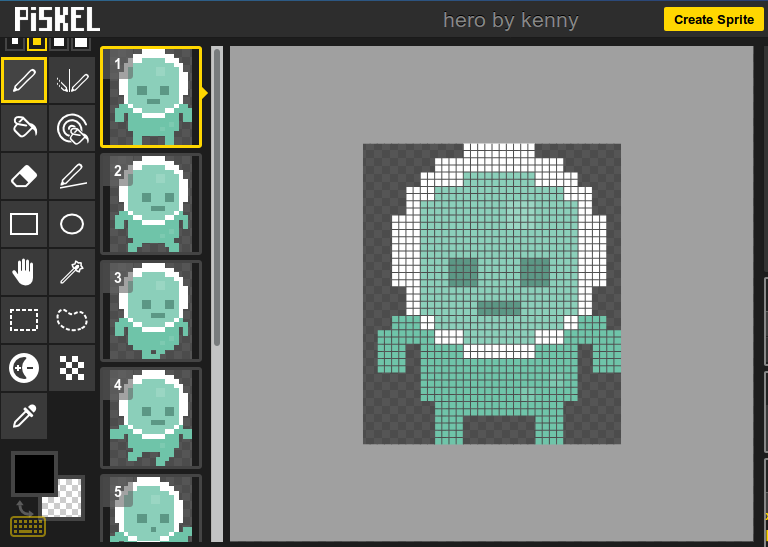
Creating an Animated Character in Piskel
Let’s use the Piskel tool to it an animated character if we want to do
so. If you like the character in the picture below then here is a link
to it on the Piskel website -
https://www.piskelapp.com/p/agxzfnBpc2tlbC1hcHByEwsSBlBpc2tlbBiAgKCogPjNCgw/view
You should be able to click on Edit Sprite to see how the “run cycle” of the hero is made.
There is a great tutorial on the whole process of making a running pixel art character here if you want to go into it in detail. http://www.lessmilk.com/tutorial/pixel-art-run-cycle
Create your character by adding frames (try cloning them and altering them) and when you are ready then export an image of your animation and follow the steps below to make it animated. Only think about your character running right for now.
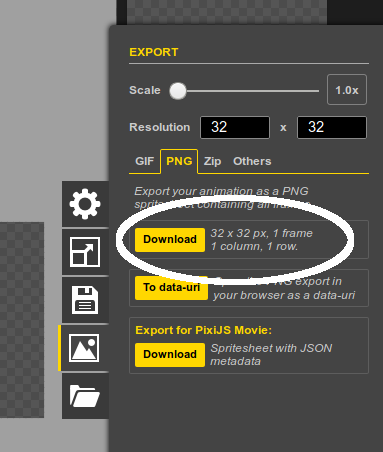
When you are happy with it then you can save it to your computer by clicking on the Export button > PNG > Download button.
Now upload it to the Assets part of your glitch.com project. There is information on how to do that in the Add a Background section.
Going over the code
The code example for adding an animated character is here https://jamm-labs.github.io/ggcp/polish-add-an-animated-player/game.js
To understand how this sprite sheet works, first of all we are going to add this to project in the wrong way. Don’t worry we’ll fix it up quickly. In the preload function area of code, add or replace the line of code which loads in a player image. You can copy this code to use our example player, or you can then alter it to swap in your own.
game.load.spritesheet("player", "https://cdn.glitch.com/5d318c12-590d-47a1-b471-92a5dc0aae9d%2Fhero.png?1539353651099")
Now when you Show the Live page you will see the following image of lots of different version of our hero.

We can use these different frames to create an animation in phaser. To do this we need to change the way we are bringing this image into the game.
Again in your preload function, change your line like the one below by adding in the two extra parameters, the numbers 36 and 42.
  game.load.spritesheet("player", "https://cdn.glitch.com/5d318c12-590d-47a1-b471-92a5dc0aae9d%2Fhero.png?1539353651099",
 36, 42);
This brings the image in as an image 36 pixels wide by 42 high which is right for our example but if you use your own, your image may be of a different size. For example, the default size in Piskel is 32 pixels wide and 32 Pixels high. If you are using your own image be sure to change those numbers.
Next to make the player seem like they are walking then we need to add some more code to tell phaser which of the frames to use. The following frames tell phaser to use some frames when our player is running, and frame zero when stopped so add the following to your create function.
  player.anchor.set(0.5, 0.5);
  player.animations.add("stop", [0]);
  player.animations.add("run", [1, 2], 8, true); // 8fps looped
  player.animations.play("stop");
Two animations are created here. The first fame, frame [0] is used for the stop animation. The next two [1,2] are used to show our player running. Depending on how many frames your animation has you may need to change these frame numbers around. Now in the update function, we need to add the following code to activate the walking animations when the cursor keys are being pressed. We also need to tell the animation to stop when there is no key being pressed. To do this add the following user-input lines anywhere in the update function.
  if (player.body.velocity.x !== 0) {
    player.animations.play("run");
  }
  else{
    player.animations.play("stop");
  }
To explain the code above, if the player is moving left or right then the velocity will not be zero, so we start the run animation. Otherwise, play the other animation where our character is stopped. This works but the player is always facing the same way. To flip the player over then add the following lines.
  if (player.body.velocity.x < 0) {
    player.scale.x = -1;
  }
  else if (player.body.velocity.x > 0) {
    player.scale.x = 1;
  }
We can see there that there isn’t a flip command but setting the player body scale property to a minus figure has that effect.
Intentionally Glitching your game can be fun. The process of flipping described above only works neatly if what something called the Anchor point of the sprite is set to be the middle of the sprite instead of the default value of the top left. This means that we can create an interesting glitch in our game by adding the following line to our create function after the player is added.
player.anchor.set(0.5, 0.5);
Try it out in your game and see how our hero glitches out.
Optional - Adding more animations
Another way to make our player face the direction that they are moving is to create your animation so that it has frames which point the other direction. There is a Flip tool which lets you do that in Piskel (on the right with 2 tall triangles).
If you take this approach then you will need to create new animations - say “runleft” and “runright” and choose the appropriate frames. They you will need to change the code above so that instead of flipping the character